How to Import VCF to Office 365 | A Complete Solution
Are you looking for a solution to import VCF to Office 365? If yes, then you will get the correct answer to your request here. This blog discusses the quick and effective way to move VCF contacts files to Office 365. From our side we try to provide our users with every possible solution to tackle this query, you can select from your perspective.
“I have a VCF file containing lots of contacts and information about other people. Now I want to export all of them to my Office 365. However, after trying a method, I lost some of my important contacts. This time I need an expert method that can import all contacts easily and safely. Can anyone tell me how to transfer VCF to Office 365? “
Reasons Why to Transfer VCF File to Office 365
In this section of this blog, we tell you about the responsible reasons why most users want to import VCF to Office 365. Read all the reasons which are responsible for this conversion.
- Office 365 is an online solution where two or more organizations can sign up for it. It is also referred to as SaaS- Software as a service solution; where users login and use the application through clouds like emails, calenders and tools.
- Several built-in functions and programs that help to protect the information stored in the nodes and increase the rate of transferring the necessary data.
- Office 365 is among the most effective cloud-based applications which come into operation in enhancing the productivity of any business organization.
- On the other hand vCard VCF is a virtual business card that contains the list of contact and basic particulars of the contact.
- It thus becomes very important to migrate contacts to Office 365 so that the user can get all the contacts s/he needs .
#Method 1: Import Using PowerShell
Below are the parameters for using powershell to import Access database. The pointed VCF files can be imported into Office 365 directly using PowerShell for the more experienced users.
- There is a need to transition the VCF files into CSV files and for this you require a script or tool. There are multiple services that can do this online or you can find scripts on GitHub.
- Connect to Office 365 via PowerShell:
- Open the PowerShell in the administrator Windows.
- Run the following commands to connect to Office 365
$UserCredential = Get-Credential
Connect-ExchangeOnline -UserPrincipalName user@domain.com -Credential $UserCredential

- Advanced use the script to read a CSV file and import the contacts to Office 365.
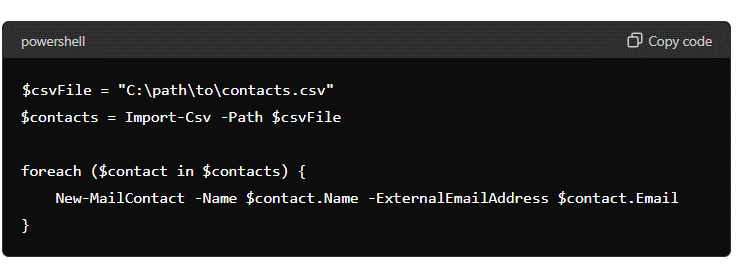
- Here is an example script:
$csvFile = “C:\path\to\contacts.csv”
$contacts = Import-Csv -Path $csvFileforeach ($contact in $contacts) {
New-MailContact -Name $contact.Name -ExternalEmailAddress $contact.Email
}

#Method 2: Import via the Office 365 Admin Center
- Open proprietary database software and open Microsoft Excel program – this will be used to view csv file.
- Create a CSV File:
- Turn on your computer and open a Spread sheet program such as the Microsoft Excel.
- Always start with creating a new file and adding the required headers into it. The headers should be:
- First Name
- Last Name
- Email Address
- Fill in the rows with some of your contact information. Check for blank rows or blank columns and try and avoid them if possible.
- Export file into a CSV file.
- Go to : Office 365 Admin Center Sign in
- Open a web browser and navigate to the Office 365 Admin Center: https://www.microsoft.com.
- Enter your Office 365 admin sign in details.
- Exchange Admin Center can be accessed by going through the following steps;
- In the left part of the window, near the line saying Navigate through the Microsoft Business Account, locate Show all and click on it in order to see more admin centers.
- Locate Exchange among the list of admin centers. This will open the Exchange Admin Center in a new browser window/tab.
- To perform this action, in the Exchange Admin Center go to recipients in the left pane.Area of the contact tab is located at the top of the page of MS outlook, it must be clicked.
- To add the contact manually, go to and the click on the + (plus) icon and select Mail contact from the options provided. To import multiple contacts, go to the next step.
- It should be noted that the More options (three dots) icon will be seen once you expand the contacts list, and having done that, you are to go to Import contacts.
- In the Import contacts dialog box, go to Choose File and from there, locate the exported csv file.
- The next action is using Next to navigate to the following step, the uploading of the file. It should be noted that Office 365 will first check the specifics of the CSV file format.
- When importing entries via a CSV file in Office 365, the software will require that you map the fields in the CSV with their equivalent in the software. Make sure that you are syncing each individual column from your CSV file with the corresponding field in Office 365.
- After mapping all the essential fields click on the Next button.
- Check the details of the import and click on Finish to have that specific import executed.
- After the importation process is over, you will have a preview of all the contacts that have been imported.
# Method 3: Import PST File to Office 365 Account
- Firstly, You need to Open your Office 365 Account.
- After that, Select the File button and then click on Open next to Import.

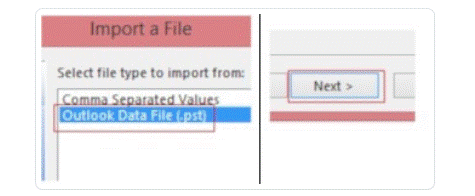
- Next, in the Import and Export Wizard, button Import from another file or program, and then click Next.

- Proceed with Outlook Data File (.pst), and Next tap on the Next button.

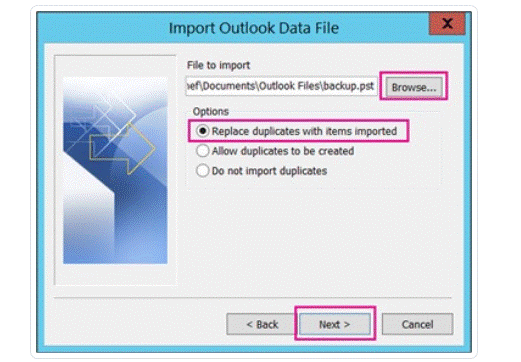
- Then, set the choices for importing items.


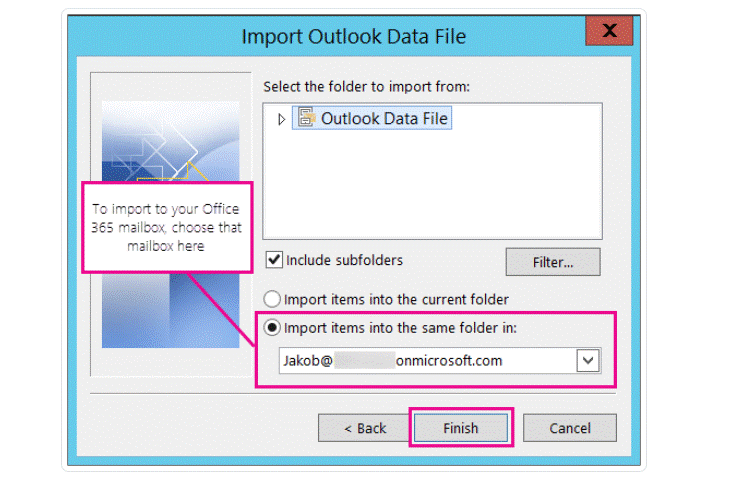
- Finally, click Finish.

# Method 4: Convert VCF Contacts to PST
So First, you need to convert the VCF contact file to PST. Next, you need to import the converted contacts into your Office 365.
As mentioned in the blog above, there is no direct way to import VCF to Office 365 without changing the file format. Therefore, you can use VCF to PST Converter to convert multiple VCF files to PST files with all details. It also guarantees that no data will be lost during the VCF conversion process.
Bottom Line
In the blog described above, we have provided you with the best solution to import VCF to Office 365. The manual solution puts your data at risk, so it is better to choose a reliable method for VCF file converter. A free demo version can be downloaded without investing a single penny to verify the functionality of the utility.


